One day I got tired of my wireless network.
I have media hungry devices:
Direct TV Home Whole Home DVR (This uses internet download for on-demand content)
Two Apple TVs
Netflix enabled Blu-Ray
Netflix enabled Xbox
AirPlay enabled speakers
My Home PC
My Work Laptop
My iPad
My iPhone
My MacBook Air
Wife’s Home PC
Wife’s Work Laptop
Wife’s iPad
Wife’s iPhone
Wife’s MacBook Air
Visitor’s devices + stuff I am forgetting
Every time I wanted fast network speeds, I had to drag a network cable from my router to somewhere in my house.
This is my solution:

DIY Home Network Closet
Of course this doesn’t directly affect wifi only devices, but this solution can offload to wired devices as much as possible. In this post I will recall my steps to set this up. This post is more of a brain dump than a step by step how to.
– Plan
- Sketch out the layout of your house. Identify each drop in each room. I wanted one coax and two network drops per room. If you can reuse the old coax drop to piggy back with new, do it. Cutting into drywall is probably the worst thing ever so avoid making brand new drops. Using old drops is great because you don’t have to fish out the wire. You can use electrical tape to the old wire and pull in the new.
- Find a central location in your house. I have a coat closet that is perfect in my scenario. My wife allowed me to take it over under one condition – no more flaky wifi or buffering on netflix. A win-win. You will notice that I have plywood in the closet. I did this so I wouldn’t have to find a stud every time I wanted to mount a device.
- Does your central location have power? I had to add an electrical outlet to my closet. This wasn’t too difficult. If you are the slightest bit scared of this, hire an electrician to set you up. Something like this – http://www.youtube.com/watch?v=CN4sxAmcRME.

Two cat5e and one RG6 connetions
– Design
Sketch out your new network closet. Ask yourself – how are my devices and wires going to be positioned? This will also help you create a materials list of things you need to buy. My setup is for 24 Gigabit network connections. I will probably never be 100% populated, but I have plenty of space for growth.

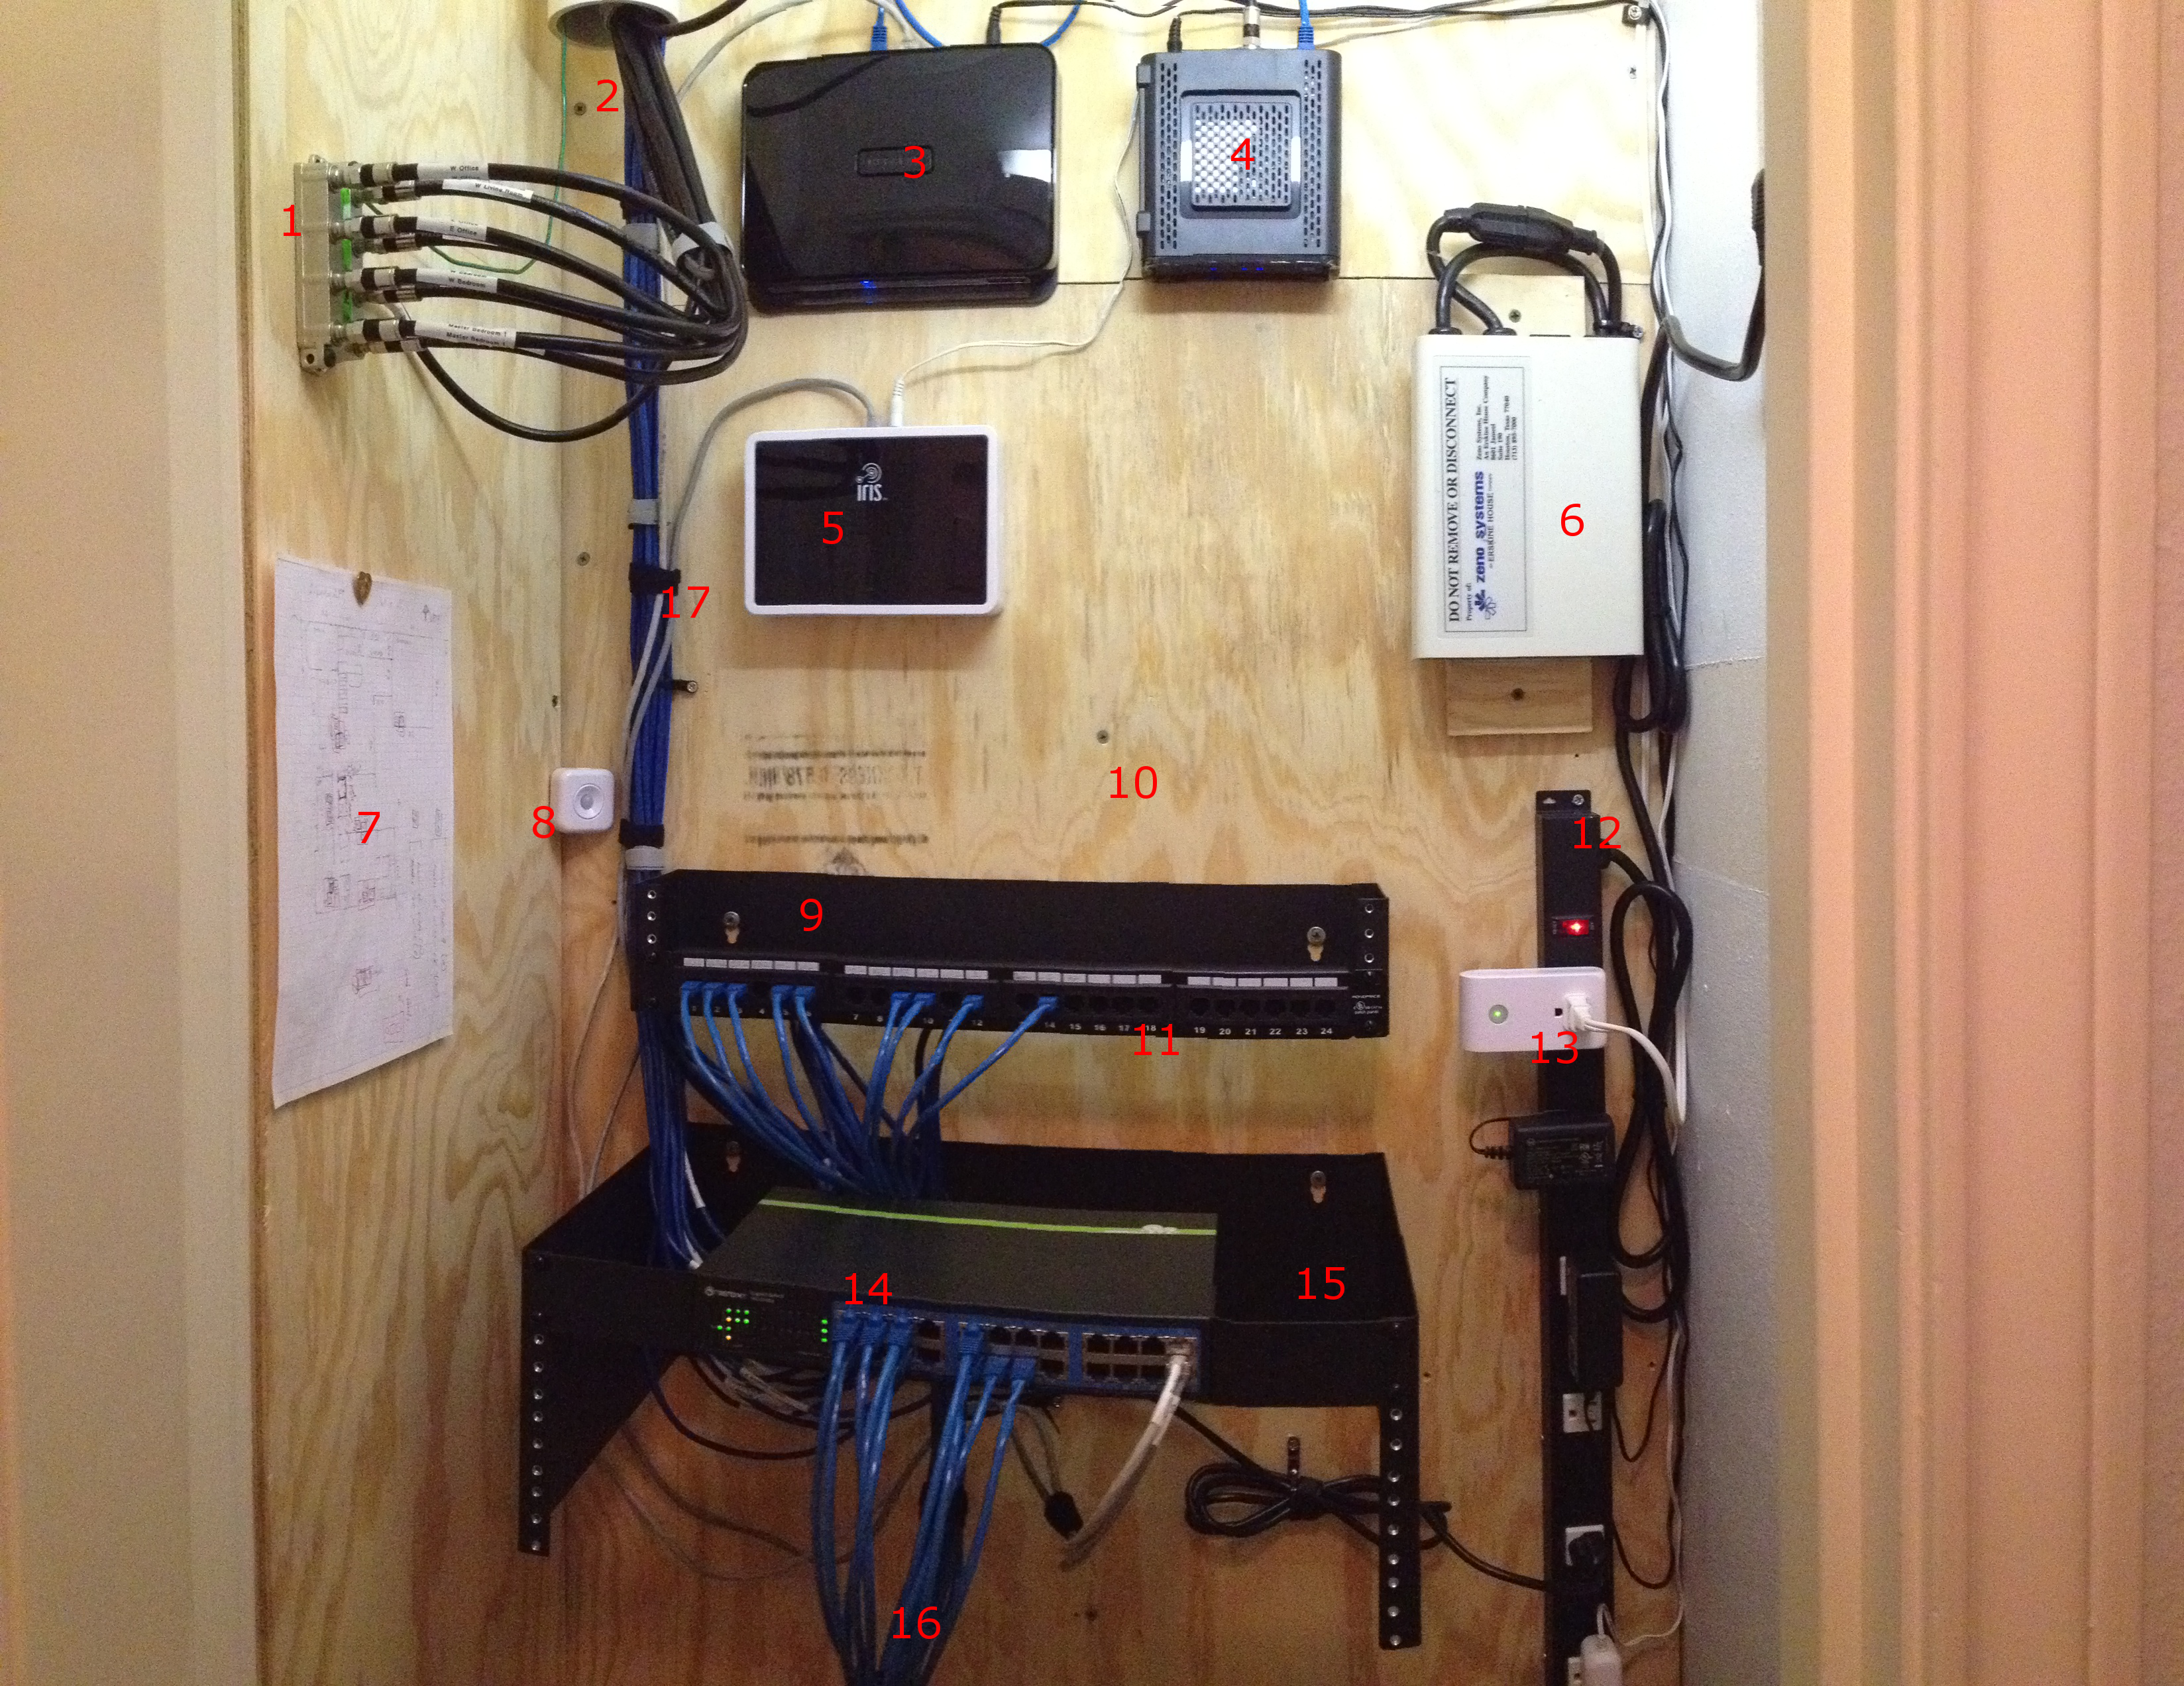
Network Closet Reference
- Direct TV big splitter. I like the idea of running all my coax inside my house from the attic. I hate seeing coax running down the side of a house with a hole drilled through from outside. These RG6 coax feeds all my rooms + garage :).
- Inlet from attic. I used a PVC tube as a conduit to the attic. This is where all my wires are fed in. I stuffed some installation in the attic side tube to keep it airtight.
- A normal netgear router. I do have it flashed with http://www.dd-wrt.com/site/index. Dd-wrt is awesome. It makes your $100 router into a $500 feature rich device. You can do ip reservations, vpn, internal dns, and much more.
- SURFboard DOCSIS 3.0 High-Speed Cable Modem. Stop paying $8 a month to comcast to lease their modem. This will pay for itself in 1 year or less.
- Lowe’s IRIS Home Automation Hub. There are probably more sophisticated home automation systems out there, but it works for me.
- Surge protector
- My sketch of the layout of my house. This shows all my drop locations.
- Motion sensor. This is part of IRIS, it senses when I open the door and turns on the closet light automatically. It also senses the temperature. It will send me a text if the closet reaches 80+ degrees.
- Monoprice Wall Mount Bracket, 3.5X19X4 (inch) , 2U (8624). This has a swivel opening on the left side, making maintenance easy.
- 3/4 inch plywood layer. Used for easy device mounting. No stud finder needed.
- Monoprice Cat5 Enhanced Patch Panel 110Type 24 port (568A/B Compatible) (7255). My punch down for my cat5e wires from my drops. The main reason to use cat5e is the ease of running the network cable through my house. Cat5e is thinner than Cat6. I don’t have to drill bigger holes in my house to fit the cable through to my drops. Personal preference is all.
- Rhino Black 4′ Metal Power Strip Frys Electronics. Plug all you stuff in here. It has a nice kill switch at the top to reset all your devices at once.
- Iris 110 Volts-Volt White Iris Smart Plug. This is controlled by the motion sensor to turn off and on the light.
- TRENDnet 24-Port Gigabit GREENnet Switch with Rack Mount Kit. This switch is great. There is no fan so there is no noise coming from the closet. It runs cool, even in the summer time.
- Monoprice Wall Mount Bracket, 7″X19″X12″ (4U) – 40lbs (8627). This holds the switch. I purchased the 4u in case I want to add on with rack mount devices.
- 3ft Cat5e Network Ethernet Patch Cable (10 Pack) – Blue. Purchased this on amazon. This is to link the patch panel to the switch.
- Velcro strips. These are used to keep your cables organized. I like using velcro strips instead of cable ties most of the time for easier maintenance. Find them on amazon.
– Materials not shown
1000ft of RG6 Digital Analog/QS Coax Cable – for your Direct TV or Cable drops.
Monoprice 1000FT 24AWG Cat5e 350MHz UTP Solid, Riser Rated (CMR), Bulk Ethernet Bare Copper Cable – Blue (880) – for your wired network drops.
Monoprice 1-Gang Low Voltage Mounting Bracket (7013) – Mounting bracket for your wall plates. You will need 1 per drop.
Monoprice Wall Plate for Keystone, 3 Hole – White (6729) – You will need one per drop.
Monoprice Cat5E Punch Down Keystone Jack – White (5376) – This is the network connection jack needed to mount in your wall plate. You will need two per wall plate per drop.
Monoprice Keystone Jack – Modular F Type (White) (6542) – This is for your coax connections needed to mount to your wall plate. You will need one per drop. These are actually pretty bad. Find better ones elsewhere.
14FT 24AWG Cat5e 350MHz UTP Bare Copper Ethernet Network Cable – White (139) – Network patch cables to your devices from your room drops.
– Tools
Amazon Network LAN / Ethernet / Telephone Cable Wire Tracker & Tester (Battery Included) – You need to test each drop.
Amazon TRENDnet Punch Down Tool with 110 and Krone Blade, TC-PDT – You will need this to punch down your network wires to your cat5e punch down block and your Keystone jack. This thing was pretty bad. It works, but if you have a friend with professional tools, borrow them.
Amazon PPC Ex6xl Rg-6 Snap & Seal Compression Connector – These are the connector ends for your coax.
Amazon Coax Compression Connector Adjustable Tool for RG59 RG6 F BNC RCA – You will need this tool to make the ends for your coax. This will take some practice. Follow some youtube tutorials. http://www.youtube.com/watch?v=lNHLG4QdyZ0.
DataShark 70029 Universal Cutter/Stripper for Flat or Round TV/UTP Cable – You will need this to strip your cat5e and coax.
Brother Label Maker – Use this to create tape labels for each wired connection in your network closet
– Finally, Get to work
The hardest part of this job is getting your hands dirty. You will have to crawl around in your attic. If you have a dedicated helper, that would make things go faster. I had the spools of wire in my garage and pulled up to the attic. I then taped the new wire to the old and ran back inside the house. I pulled the old wire from the old drops until the new wire came through.
Next I made sure I had a enough slack and dropped the new wires through the PVC into my network closet. Once all the wires were dropped I started my punch down in my closet. I then punched down at the room drop. Once I completed each termination I used my tester tool to verify good connections.
Coax was similar except I used a coax crimp tool instead of the punch down tool.
As a final test I connect my laptop to test each drop to verify internet connectivity.
– Conclusion
I now have great speed to all my devices. The best part – great quality netflix streams and fast on-demand downloads. Please leave any comments if you have questions or if it seems I left something out. Thanks.

File copy across the wired network

Internet Speed